ESP32
Introduction
The ESP32 is a versatile and widely used microcontroller developed by Espressif Systems, and it is the successor to the popular ESP8266. It's part of the ESP (Espressif Systems Platform) family, which includes a range of chips designed for Internet of Things (IoT) applications. The ESP32 is particularly popular due to its powerful capabilities, low cost, and integrated Wi-Fi and Bluetooth connectivity.
Features of the ESP32:
- Dual-core processor: The ESP32 features a dual-core Tensilica Xtensa LX6 processor, which enables multitasking and efficient handling of complex tasks.
- Wi-Fi and Bluetooth connectivity: Built-in support for both Wi-Fi (802.11 b/g/n) and Bluetooth (Bluetooth Low Energy) allows seamless integration into IoT projects requiring wireless communication.
- Rich peripheral set: The ESP32 includes a wide range of peripheral interfaces such as SPI, I2C, UART, ADC, DAC, PWM, and more, enabling easy interfacing with various sensors, actuators, displays, and other components.
- Low power consumption: The ESP32 is designed to operate efficiently, with various power-saving modes to extend battery life in battery-powered applications.
- High level of integration: Many additional features are integrated into the ESP32, including touch sensors, temperature sensor, hall effect sensor, cryptographic hardware acceleration, and more, reducing the need for external components in many applications.
- Development ecosystem: Espressif provides comprehensive development resources, including an SDK (Software Development Kit), development boards, documentation, and community support, making it easy for developers to get started with ESP32-based projects.
The ESP32 has a wide range of IoT applications, including home automation, wearable devices, industrial monitoring, and more.
Tutorials
- Introduction to ESP32 - Getting Started (YouTube video)
ESP32 Microcontrollers
there are several variations of the ESP32 microcontroller produced by Espressif Systems, each tailored to different use cases and requirements. Some of the common variations include:
- ESP32-WROOM Series: Integrating the ESP32 chip with flash memory and antenna. Popular for small form factor and ease of integration into various projects.
- ESP32-WROVER Series: These include additional PSRAM (pseudo-static random-access memory), for applications requiring higher RAM capacity, such as graphics-intensive tasks or multitasking applications.
- ESP32-PICO Series: Even smaller modules designed for space-constrained applications, often with built-in flash memory and antenna, making them suitable for compact designs.
- ESP32-S Series: Designed specifically for secure IoT applications, includes hardware-based security accelerators, secure boot, and cryptographic functions for data integrity and confidentiality.
- ESP32-C Series: These modules are certified for industrial use, meeting specific standards for reliability, ruggedness, and environmental conditions. They are suitable for applications in harsh industrial environments.
ESP32 Boards
There are numerous ESP32 development boards in production, each tailored to different applications and preferences of developers. Here are some popular ESP32 boards and their respective purposes:
- NodeMCU-32S: Based on the NodeMCU development platform, this board combines the ESP32 module with additional features like USB-TTL converter, voltage regulator, and pin headers. It's popular among hobbyists and makers due to its ease of use and compatibility with the Arduino IDE.
- Sparkfun ESP32 Thing: A compact development board featuring the ESP32 module, LiPo battery charger, voltage regulator, and various GPIO headers. It's designed for IoT projects and wearable applications. (buy)
- ESP32-CAM: This board integrates the ESP32 module with a camera module, making it suitable for projects involving video streaming, surveillance, or image processing applications.
- ESP32-Ethernet-Kit: This development board includes Ethernet connectivity in addition to Wi-Fi and Bluetooth, making it suitable for applications requiring wired networking.
- ESP32-DevKitC: This is one of the official development boards provided by Espressif Systems. It features an ESP32-WROOM-32 module, USB-UART bridge, and various GPIO headers, making it suitable for general-purpose development and prototyping.
- ESP32 Wemos D1 Mini: Similar to the NodeMCU, this board is a compact version featuring the ESP32 module with built-in USB-TTL converter, voltage regulator, and pin headers. It's suitable for projects with space constraints or those requiring a smaller form factor.
- ESP32 FireBeetle: Produced by DFRobot, this board is designed for low-power applications with its integrated LiPo battery charger and power management circuitry. It's suitable for portable and battery-powered projects. (buy)
Developers can choose the board that best fits their project requirements, whether it's ease of use, compact size, specific features, or compatibility with existing platforms and tools.
Arduino IDE
To start programming an ESP32 NodeMCU board using the Arduino IDE, you'll need to follow these steps:
-
Install the Arduino IDE: If you haven't already, download and install the Arduino IDE from the official website.
-
Install ESP32 Board Support: Open the Arduino IDE, then :
-
Go to
File>Preferences. In the "Additional Board Manager URLs" field, add the following URL:https://dl.espressif.com/dl/package_esp32_index.json -
Click OK to close the Preferences window.
-
Go to
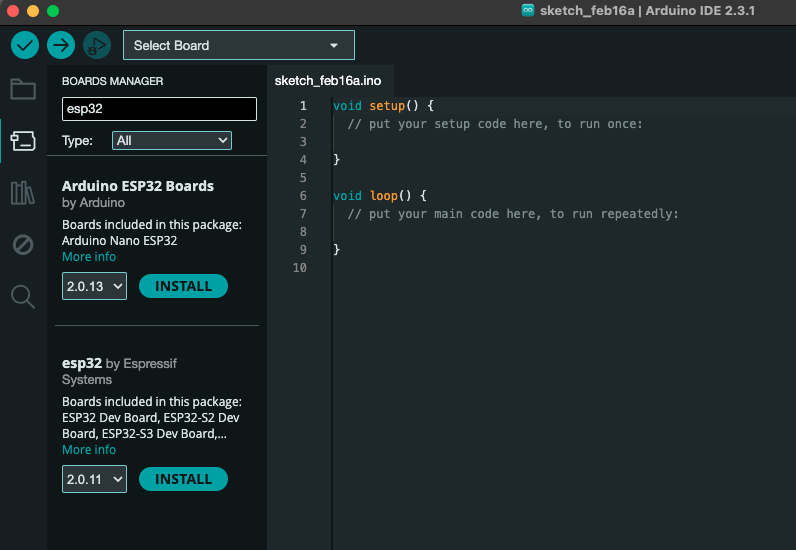
Tools>Board>Boards Manager..., search for "ESP32" -
Install "esp32" by Espressif Systems.
-
-
Select ESP32 Board: Once the ESP32 board support is installed, go to
Tools>Boardand select your ESP32 board from the list. For the NodeMCU, you might find it listed under "NodeMCU-32S". -
Select Port: Connect your ESP32 NodeMCU board to your computer using a USB cable. Then, go to
Tools>Portand select the appropriate port for your board. The port should appear as "COMx" on Windows or "/dev/cu.xxx" on macOS. -
Write Your Sketch: Now, you can start writing your Arduino sketch. You can use familiar Arduino functions and libraries, as well as specific ESP32 functions for Wi-Fi, Bluetooth, etc.
Blink:
int flashPin = 4;

void setup() {
    pinMode(flashPin, OUTPUT);
}

void loop() {
    digitalWrite(flashPin, HIGH);
    delay(1000);
    digitalWrite(flashPin, LOW);
    delay(1000);
}
-
Upload Your Sketch: Once your sketch is ready:
- Hold down the BOOT button and click the Upload button (right arrow icon) in the Arduino IDE toolbar to compile and write your sketch to the ESP32 NodeMCU board.
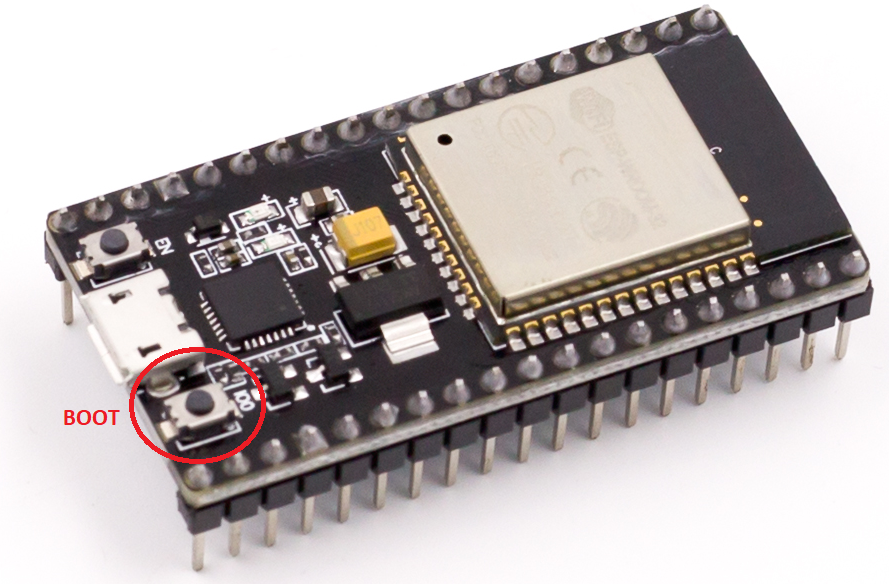
- Keep your finger pressed on the BOOT button until the Arduino IDE starts sending the code. Then you can release the button and wait for the flashing process to be completed. Make sure your board is connected to the computer via USB during this process.
- Hold down the BOOT button and click the Upload button (right arrow icon) in the Arduino IDE toolbar to compile and write your sketch to the ESP32 NodeMCU board.
-
Monitor Serial Output: After uploading the sketch, you can open the Serial Monitor (
Tools>Serial Monitor) to view debug messages and program output from the ESP32. -
To see the results of the new sketch, press the EN button (the other button). The blue LED should now flash once per second.
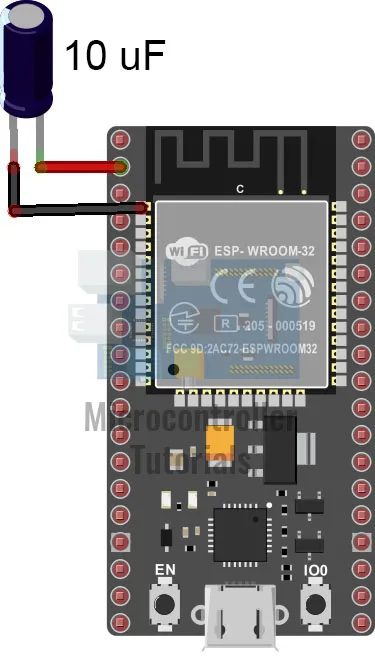
- Note: Holding down the BOOT button during upload is inconvenient. A workaround is to attach a 10uF electrolytic capacitor between the EN pin and the GND pin of the board. See image below: